
Hello friends!
I have started off again with blogging regularly so you are going to see me here often :)
Today I have two mixed media tags to show you all I created this as the DT project for Crafters corner blog.
I have also shared a pictorial tutorial there so please hop over and leave a comment if you like it.
Here are a few pics..

My Lindys sprays always come in handy with any mixed media project. God! I love them sooo much :)


Love those Prima embellishments <3

Here is a pictorial tutorial for the same-
Step1:

I used some scrap cardstock paper that I had randomly misted/sprayed using Lindys stamp gang sprays. I had a big sheet that was spoiled as I spilled a lot of my mist of it.Then it became my testing sheet for mists and finally I decided to make it my base for tags.
Isn't that a great way to reuse what you always thought as scrap? I simply loved using this as my base. More so as I could make use of something that was totally a waste. You can use almost any colours of sprays you wish to.
I cut this sheet into 4 rectangular tag shapes using my We R memory Keepers trim and score board. This is a trimmer cum score board in one and is a good buy if you are looking for something affordable and compact as it it is a two in one at the cost of one equipment and is fold-able at the same time thus saving storage space.
Step 2:

I distressed the edges of the tags using the Prima comfort craft distressing tool. I just love using this tool for giving distressed edges to my paper. This is so versatile you will sure fall in love with this tool. It is by far my most favourite purchase of all times in tools!
Step 3:
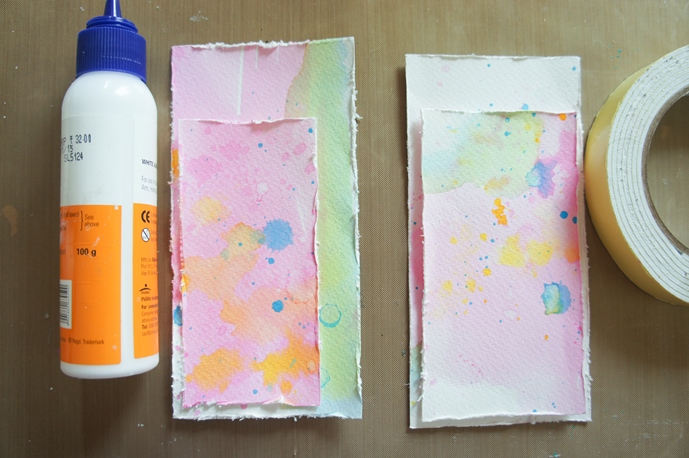
I stacked the smaller tag shape on the lager one and did this with both the sets . One of them I glued down with white glue easily available in the market. You may use the Aleene's tacky glue which have really great reviews. and the second one I used the double sided foam tape. It is one of the best ways to give dimension.
Step 4:

I did some stamping on the tags using some black archival ink and Kaisercraft dictionary meanings stamp.
Step 5:

Added some modelling/texture paste with Crafters workshop microbial stencil and spatula.
Step 6:

Heat dry with Rangers heat it tool.
Step 7:

Added some mist on the stencilled area again . I chose Sweet violet purple teal starburst spray from Lindy's stamp gang. Any colour spray can be used here.
Step 8:

I looked at how I wanted my embellishments to go.
Step 9:

Finally start adhering the embellishments. I have used quite a few Prima embellishments and flowers you see here.
Prima wood embellishments- Leaves and mushrooms
Prima Typo bulbs
Prima small typo bulbs
Prima bird houses
Mulberry flowers- Poppy flower
Micro roses
Rose buds
Curved roses
Step 10:

Fussy cut some gorgeous butterflies from the Pion design paper- Paris flea market- Postcards using my Tonic scissors. Another of my HOT FAVOURITE tools!
I then adhered them on the tag using white glue.
Step 11:

Once my butterflies where in place I applied some diamond dust and
Prima art ingredient- Granite Mica flakes randomly to give some interest to the composition. Also added a few rhinestones here and there.
Step 12:

I punched a hole on the top centre portion of the tag using the We r memory keepers crop a dile punch and misted some seam binding ribbon using the Lindy's sparys using the Yellow Rose of Texas and Hottie patoite Hot pink starburst spray and Mowed lawn distress ink.
Next was just pulling the ribbon through the punched hole and tying the knot.
Supplies used-
We R memory Keepers trim and score board
Lindys stamp gang sprays
Prima comfort craft distressing tool
Double sided foam tape
Black archival ink
Kaisercraft dictionary meanings stamp.
modelling/texture paste
Crafters workshop microbial stencil
spatula
Rangers heat it tool.
Prima wood embellishments- Leaves and mushrooms
Prima Typo bulbs
Prima small typo bulbs
Prima bird houses
Mulberry flowers-
Pion design paper- Paris flea market- Postcards
Tonic scissors
Diamond dust
Prima art ingredient- Granite Mica flakes
We r memory keepers crop a dile punch
Lindys stamp gang sprays- Yellow Rose of Texas
Hottie patoite Hot pink starburst
Cotton candy pink
Sweet violet purple teal
Rusty lantern lime
Cathedral Pines Green
Bachelor button blue
Mowed lawn distress ink

Lindys sprays used
Bachelor button blue
I am also entering it to the Prima Product pick.
I chose to go with yellow,cream,green,light pink raspberry and blue.. ;) yup all of them.. :)

I am also entering it to the Prima Product pick.
I chose to go with yellow,cream,green,light pink raspberry and blue.. ;) yup all of them.. :)
Prima products used-
Prima small typo bulbs
Prima resin embellishment-birdhouse
Prima typo bulb- large
Prima wood embellishments- leaves and mushrooms
Prima stencil- bubbles
Prima art ingredient- mica flakes
Prima art basics modeling paste opaque white
Prima art ingredient - glass beads crystal
Prima heavy gesso- black for splatters
Hope you like it. Please let me know through your comments.
Have a great crafty week!
Hugs
Jaya
Have a great crafty week!
Hugs
Jaya
Glad to see you posting regularly Jaya !! Gorgeous tags...the colors are so pretty :)
ReplyDeleteThese are sublime Jaya!! - So utterly feminine and gorgeous! Love the light colours. :-)
ReplyDeleteThe are beautiful tags. Love the colors.
ReplyDeleteHopefully, I will also be back to blogging and creating again. The Lindy Sprays are awesome.
beautiful, sweet and delicate at the same time ! Thank you for joining us with the Lindy's Stamp Gang challenge !
ReplyDeleteI followed the link to the tutorial and nothing is there. I would love to see it!
ReplyDeleteHey Sandra.. Thank you for visiting my blog. Here is the link to the photo tute.. http://crafterscornerindia.blogspot.in/2015/04/mixed-media-tags-with-pictorial-tutorial.html
DeleteHope you enjoy it :)
Jaya, your tags are just beautiful!! I love the romantic colors and the way you used them!! Thank you for joining us at Lindys for the Color Challenge!!
ReplyDeleteThank You Lisa :)
DeleteOh, soooo beautiful <3 I love the colors <3 Amazing background - just perfect :) Thank You for playing with us at Lindy's Stamp Gang this month :)
ReplyDeleteWow so soft and beautiful! I love the colors, great work! Thank you for joining our challenge at Lindy's Stamp Gang!
ReplyDelete